Tensorflow Object Detection API with custom training data
1. Anaconda3 설치
윈도우즈에 아나콘다, 텐서플로 설치하기
텐서플로(TensorFlow)를 사용하려면 파이썬(Python) 개발 환경이 필요합니다. 파이썬 공식 사이트에서 인스톨파일을 다운받아 설치할 수 있지만 과학 계산을 위한 여러 파이썬 패키지를 따로 설치해야 합니다. 대표적으로는 SciPy, NumPy, scikit-learn 등이 있습니다. 이따금 이런 패키지들을 설치할 때 곤란한 경우가 생길 수 있습…
tensorflow.blog
참고하여 설치하였다.
2. Object Detection API at Windows 동작에 필요한 개발환경 구성, 설치
https://jamessong.tistory.com/2
tensorflow object detection API at Windows 동작 에 필요한 개발 환경 구성
윈도우 기반 Tensorflow Object Detection을 통한 실시간 객체 탐지.(Anaconda) 1. 우선 Windows 전용 아나 콘다를 설치 한다. - https://www.anaconda.com/download/ 2. Anaconda promt 실행 하고 하기 아래와 같..
jamessong.tistory.com
참고하여 진행하였다.
3. LabelImg
https://github.com/tzutalin/labelImg 을 다운로드 받아 설치한다.

- 수집한 dataset들을 labeling 해준다.
labelImg 디렉토리에서 가상환경을 활성화한 후, 아래 명령을 실행시켜 진행한다.
> (Anaconda prompt) python labelImg.py \images\train
- 박스가 잘 형성되었는지 sizeChecker.py로 확인
> python sizeChecker.py --move
- 이미지의 주석들이 반드시 *.xml로 형성되어야 한다.
(실습을 진행할 때, 너무 힘들어 DarkLabel이라는 툴로 갈아탔다.)
- 링크 찾아 넣기
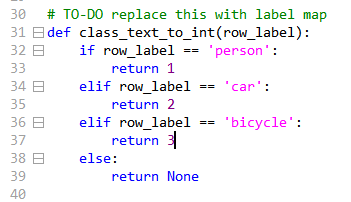
4. Label Map 수정
- pbtxt 확장자 파일은 dataset에서 라벨링한 내용을 포함한다.

- generate_tfrecord.py 31번째 줄 또한 모델에 맞게 수정한다.

5. Creating TensorFlow Records
- 주석이 포함된 dataset을 TFRecord 포맷 형식으로 변환해야 한다.
1) Converting from *.xml to *.csv
- xml_to_csv.py 파일을 실행시켜 진행시킨다.
- 이 파일을 실행하기 위해서는 pandas가 필요하기 때문에 pip install pandas로 설치해주고 진행한다.

- 새로 생긴 파일은 object_detection\data 아래에 test_labels.csv, train_labels.csv로 위치하게 된다.
2) Converting from *.csv to *.record

- test도 똑같이 진행해준다.
- DarkLabel로 라벨링하면 결과가 txt로 나오게 된다. .txt를 바로 .csv로 바꾸기 위해 파이썬 코드를 짜서 csv로 변환되도록 하였다.
(txt_to_csv.py 넣기)
6. Configuring a Training Pipeline
- \models\research\object_detection\samples\configs로 가서 faster_rcnn_inception_v2_pets.config 파일을 복사한 후에 \object_detection\training 디렉토리에 붙여넣기
수정할 것들
- num_classes: 감지하고 싶은 객체들의 수로 변경.
ex) person, car, bicycle -> 3

- fine_tune_checkpoint 변경
** 주의: \\ 이렇게 두개씩 넣어주기

- input_path, label_map_path 변경

- num_examples: \image\test 디렉토리에 가지고 있는 이미지 수로 변경

- input_path, label_map_path 값 변경

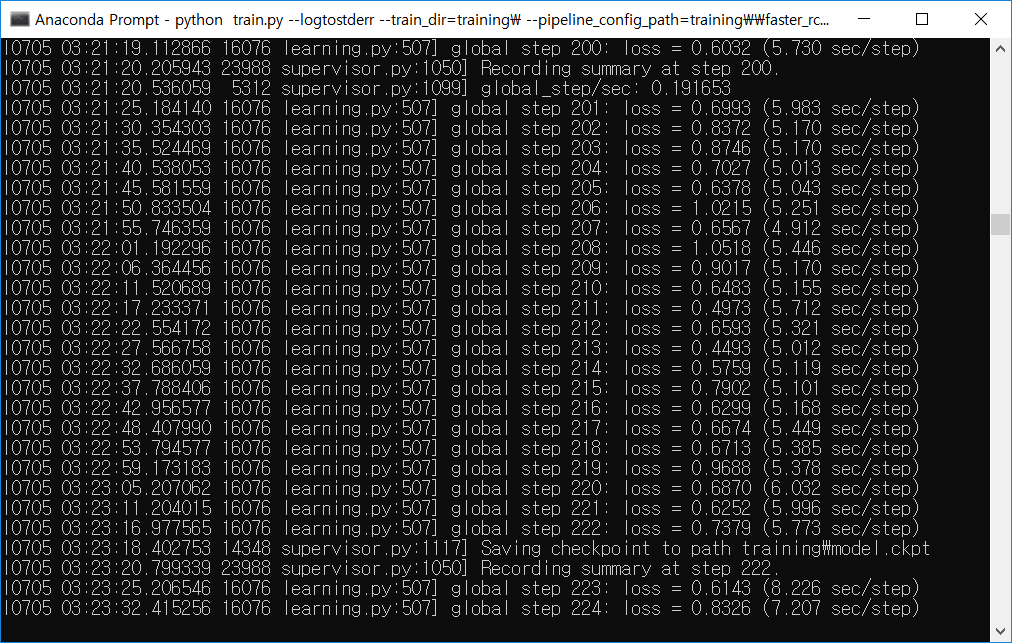
7. Run the Training
python train.py --logtostderr --train_dir=training/ --pipeline_config_path=training/faster_rcnn_inception_v2_pets.config
위와 같이 입력

8. Object Detection API 결과

tensorboard --logdir=./training

9. Exporting the TensorFlow Graph
Training후, 생성된 model.ckpt-{CEHCKPOINT_NUMBER}.* 파일들을 inference_graph로 변환하여 학습된 모델을 평가한다.


다음과 같이 inference_graph 생성된 것을 확인 가능하다.
10. Test preparation
object_detection_tutorial.ipynb 코드를 일부분 수정해서 test할 것이다.


# For the sake of simplicity we will use only 2 images:
# image1.jpg
# image2.jpg
# If you want to test the code with your images, just add path to the images to the TEST_IMAGE_PATHS.
PATH_TO_TEST_IMAGES_DIR = 'images\\test'
TEST_IMAGE_PATHS = [ os.path.join(PATH_TO_TEST_IMAGES_DIR, 't1_video_00001_000{}.jpg'.format(i)) for i in range(41, 50) ]
# Size, in inches, of the output images.
IMAGE_SIZE = (12, 8)
>> 줄 친 부분 수정
** 실행 결과 **

참고
'인공지능' 카테고리의 다른 글
| Violence Detection 분석 (0) | 2019.08.09 |
|---|---|
| Violence Detection 실습 (0) | 2019.08.05 |
| [모두의 딥러닝] lab 10. NN, ReLu, Xavier, Dropout, and Adam (0) | 2019.05.28 |
| [모두의 딥러닝] lec 10-4. 레고처럼 넷트웍 모듈을 마음껏 쌓아보기 (0) | 2019.05.27 |
| [모두의 딥러닝] lec 10-3. NN dropout and model ensemble (0) | 2019.05.27 |


댓글