Violence Detection 분석
1. Requirement 분석
1) sk-video
: Reading & Writing Videos
skvideo.io is a module created for using a FFmpeg/LibAV backend to read and write videos. Depending on the available backend, the appropriate probing tool (ffprobe, avprobe, or even mediainfo) will be used to parse metadata from videos.
참고: http://www.scikit-video.org/stable/io.html
Reading and Writing Videos — scikit-video 1.1.11 documentation
Reading and Writing Videos skvideo.io is a module created for using a FFmpeg/LibAV backend to read and write videos. Depending on the available backend, the appropriate probing tool (ffprobe, avprobe, or even mediainfo) will be used to parse metadata from
www.scikit-video.org
2) scikit-image
: python용 오픈소스 이미지 처리 라이브러리
- 세분화, 기하학적 변형, 색 공간 조작, 분석, 필터링, 형태학, 형상 감지 등의 알고리즘이 포함됨
- python 수치 및 과학 라이브러리인 NumPy 및 SciPy와 상호 운용되도록 설계됨
- 활용 예: Image segmentation, Marker based methods
참고:
파이썬/라이브러리/scikit-image
# 개요
www.incodom.kr
3) imgaug
- Object Detection 문제를 포함하여 딥러닝을 이용한 영상인식 접근 방법은 많은 수의 학습 이미지가 요구됨
- 직접적으로 최대한 확보할 수 있는 이미지의 수가 적절한 모델을 학습하기에 충분하지 않을 경우엔 원본 이미지에 약간씩의 변형을 줌으로써 새 이미지를 생성하는 image augmentation 방법을 쓴다.
- Object Detection에는 보유한 학습 이미지 데이터셋에 대해 supervised learning을 위한 bounding-box labeling 작업이 포함됨
100장의 원본 이미지가 있을 때, 100개의 Annotation (bounding-box 정보를 포함한 정답 label)을 만들어야 하는데, 이 작업은 수작업으로 이루어진다.
- image augmentation을 통해 이미지를 10000장으로 증가시켰다면, 새로 생긴 것에 대해서 다시 annotation을 만들어야 하나?
> 이를 위한 도구: python 라이브러리 imgaug
참고:
imgaug를 이용하여 바운딩박스 정보를 포함한 이미지 증폭시키기
Object Detection 문제를 포함하여 딥러닝을 이용한 영상인식 접근 방법은 많은 수의 학습 이미지가 요구된다. 직접적으로 최대한 확보할 수 있는 이미지의 수가 적절한 모델을 학습하기에 충분하지 않을 경우에는 원본 이미지에 약간씩의 변형을 줌으로써 새 이미지들을 생성하는 image augmentation 방법을 고려할 수 있다.
junyoung-jamong.github.io
2. Quick Start 분석
1) Train_Val_Test_spliter.py
: 데이터셋을 train, val, test로 분할해준다.
2) settings\DataSettings.py
: train, val, test의 경로를 지정
- BATCH_SIZE: 한 step에 몇 개의 비디오를 학습할 것인지
- UNROLLED_SIZE: 비디오로부터 몇 개의 프레임을 추출할 것인지
- GROUPED_SIZE: net이 필요로 하는 프레임의 개수
- NUMBER_OF_CATEGORIES: ex) non-violence, violence
- TIMEOUT_FOR_WAIT_QUEUE: BATCH_SIZE에 따라 다르게 설정
3) settings\TrainSettings.py
train에 필요한 설정들을 해 준다.
- PRETAIN_MODEL_PATH_NAME: 이전에 학습했던 ckpt를 불러온다.
- PATH_TO_SAVE_MODEL: 위와 동일
4) settings\NetSettings.py
src.net 중 쓸 NET을 import
5) Train.py
model을 train
6) Deploy.py
video를 보여주고 프레임 당 violence가 있는지 보여줌
7) Evaluate.py
dataset catelog와 model ckpt의 정확성을 평가
8) src\data
data 처리하는 라이브러리들이 있음
9) src\layers
Convinient functions or wrappers for tensorflow
여기의 layer 설정은 settings\LayerSettings.py
10) src\net
The network blueprints가 있는 곳
예시들과 나의 network를 디자인할 수 있음
** network를 develop할 경우 settings\NetSettings.py 수정하기
11) src\third_party
Third-party 라이브러리가 들어있음.
- data augmentation 라이브러리인 imgaug만 존재
12) src\data\DataAugmenter.py
- imgaug을 이용하여 data를 augment하는 것으로 추정
13) src\dada\DataManager.py
- dataset(video들) 관리
14) src\data\ImageUtils.py
- ConvertImageFrom_RGB255_to_NetInput()
: image를 Net으로 변환해서 넣어주는 것이라고 추정
15) src\dada\VideoData.py
- video의 frame, label, images 등을 관리, 검사(?)
16) src\layers\BasicLayers.py
- Layer
17) src\layers\LayerHelper.py
- tf의 variable을 create하는 등의 layer의 helper
18) src\layers\ResidualLayers.py
'''
This function will create Residual Block as follows:
(supposed that listOfConvFilterSize_ = [a, b, c])
|
----------------|
| |
| Conv 1x1, a
| Conv 3x3, b
| Conv 1x1, c
| --- |
|------|+|------|
---
|
For example, to build the block in the second layer in ResNet:
listOfConvFilterSize_ = [64, 64, 256]
'''
19) src\layers\RNN.py
- about LSTM
20) src\net\
NET 종류들 다 들어있는 곳
21) src\net\data\pretainModels\darknet19: darknet19 넣어둔 곳
22) src\AccuracyCalculator.py
- 정확도 계산하는 것
23) src\Classifier.py
- inputImage, batchSize, unrolledSize, isTraining 등을 placeholder로 만듦
24) src\Evaluator.py
- evaluator
25) src\Trainer.py
- train에 관련된 것들
26) src\ViolenceDetector.py
'''
The argument 'netInputImage_' should be shape of:
[dataSettings.IMAGE_SIZE, dataSettings.IMAGE_SIZE, dataSettings.IMAGE_CHANNELS]
And the value of each pixel should be in the range of [-1, 1].
Note, if you use OpenCV to read images or videos, you should convert the Color from
BGR to RGB. Moreover, the value should also be converted from [0, 255] to [-1, 1].
'''
27) Deploy.py
28) Evaluate.py
29) Train.py
.
.
.
http://joshua-p-r-pan.blogspot.com/2018/05/violence-detection-by-cnn-lstm.html
Violence Detection by CNN + LSTM
Overview This article shows the detail of my currently developed project: Violence Detection. The proposed approach outperforms the st...
joshua-p-r-pan.blogspot.com
The previous work on violence detection use traditional features such as the BoVW, the STIP, and the MoSIFT, and classify the features by SVM [2].
Ding et. al. extract the spatial and temporal features by the 3D convolution layers and classify the features by the fully-connected layers (as shown in Fig. 1) [3].
However, both of the proposed methods do not well support the variable length of videos. And the computational time of 3D convolution grows rapidly because of the depth of the temporal axis.
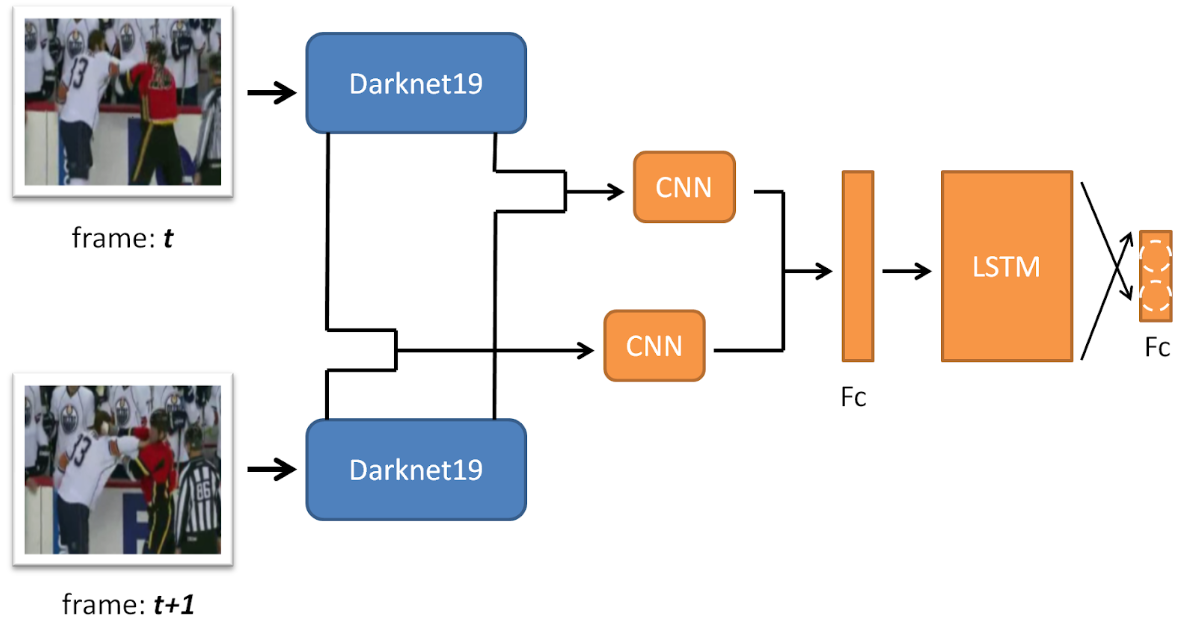
A CNN takes the input video frames and outputs the features to the Long Short-Term Memory (LSTM) to learn global temporal features and finally classify the features by fully-connected layers. This network can not only implement by the pre-trained models in ImageNet, but also have the flexibility to accept variable length videos, and even boosts the accuracy to the 98.5% while still processing the image in real-time (80 fps on Nvidia GTX 1080 Ti).
---------------------------------------------------------------------------------------------------------------------------------

blue layer: pre-trained on the ImgaeNet dataset & frozen during training
orange layer: be trained on the video dataset
The pre-trained model은 real-time performance로 Darknet19에 의해 실행된다. ImageNet의 정확도를 위해서
Darknet19는 19개의 Convolutional layer 포함하고 있음
degradation 문제를 피하기 위해 추가적인 CNN이 residual layers에 의해 실행된다.
'인공지능' 카테고리의 다른 글
| [labeling] Yolo_mark로 라벨링 (1) | 2019.09.04 |
|---|---|
| Implementation of YOLO v3 object detector in TensorFlow (0) | 2019.08.22 |
| Violence Detection 실습 (0) | 2019.08.05 |
| Tensorflow Object Detection API with custom training data (0) | 2019.07.05 |
| [모두의 딥러닝] lab 10. NN, ReLu, Xavier, Dropout, and Adam (0) | 2019.05.28 |


댓글